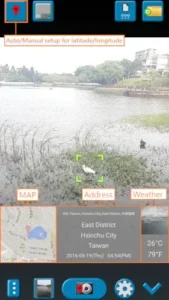
GPS Map Camera It solves real problems for people who need to prove where and when a photo was taken.

Whether you’re a delivery driver, field researcher, or just someone who wants to remember exactly where that perfect sunset was, here’s what you’re really getting from GPS Map Camera.
Why GPS Map Camera App Stands Out in a Crowded Market
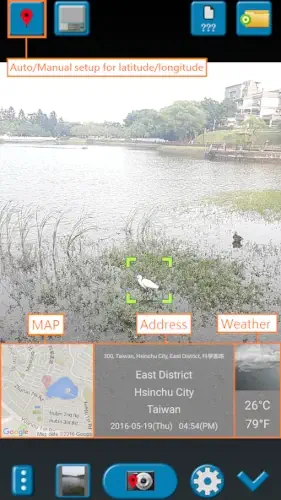
Most camera apps focus on filters and beauty modes. GPS Map Camera does something radically different – it turns your photos into verifiable documentation. The moment you take a picture, it automatically stamps:
-
Precise GPS coordinates (down to 3-meter accuracy in good conditions)
-
A mini Google Map showing the exact location
-
Current weather conditions
-
Date and time (with timezone awareness)
This isn’t just metadata buried in EXIF data – it’s visually overlaid on the image itself, making it immediately useful for:
-
Delivery drivers proving package drop offs
-
Insurance adjusters documenting claims
-
Scientists recording field observations
-
Travel bloggers creating location-perfect content
The Features That Actually Make a Difference
Geotagging That Works (Mostly)
The app taps into your phone’s GPS with impressive accuracy. In urban areas, it typically places you within 5-10 meters. Rural areas might see 20-30 meter variance. Pro tip: Wait for the GPS indicator to turn green before shooting for best results.
Customization That Doesn’t Overwhelm
You can choose:
-
Which elements appear on your photo (map, coordinates, weather, etc.)
-
Map style (satellite, terrain, or hybrid)
-
Font size and color for text overlays
-
Whether to save both stamped and clean versions
Professional-Grade Usefulness
The dual-file saving is genius for work use – send the stamped version to clients while keeping clean copies for yourself. The customizable file naming (including date/location variables) keeps everything organized.
What Users Think (The Good and Bad)
What Works Well:
The geotagging is frighteningly accurate when GPS signal is strong
Having both stamped and unstamped versions saves tons of editing time
Ads are present but not obnoxious (they don’t interrupt photo taking)
What Needs Improvement:
No SD card support means heavy users quickly fill phone storage
Address lookup can lag (the map shows immediately but street names take longer)
Some premium features feel like they should be included in the free version
GPS Map Camera for Real Estate & Beyond: A Practical Guide
If you’re in real estate or any field where location documentation matters, here’s exactly how GPS Map Camera can work for you, and where it might fall short.
Why Real Estate Professionals Should Care
This app solves three critical needs:
-
Property documentation – Every listing photo automatically proves its location
-
Time-stamped evidence – Shows exactly when you assessed a property
-
Visual verification – The map overlay makes locations instantly recognizable
How it compares to alternatives:
-
Built-in phone cameras: Only embed hidden metadata
-
Other geotagging apps: Often cluttered with unnecessary features
-
Dedicated real estate apps: Typically require expensive subscriptions
Step by Step: Getting Professional Results
Initial Setup (2 Minutes)
-
Enable high accuracy mode in your phone’s GPS settings
-
Choose your overlay style (recommended: Map + address + date)
-
Set file naming to include:
-
Property address (manually entered)
-
Date (auto-added)
-
Sequence number
-
Capturing Listing Photos
-
Wait for the GPS indicator to turn green (about 15-30 seconds)
-
Frame your shot with the map overlay visible but not obstructive
-
Tap to focus on key details (for interiors, focus on the room’s best feature)
Post Shoot Workflow
-
The app automatically saves:
-
Stamped version (for client presentations)
-
Clean version (for editing/MLS uploads)
-
-
Files organize by:
-
Property address
-
Date
-
Room/area type (ex: “123-Main-St_20240615_LivingRoom_1”)
-
Troubleshooting Common Issues
-
Poor GPS signal in buildings:
-
Take a reference shot outside first
-
Manually adjust indoor photos to match
-
-
Overlays blocking important details:
-
Reposition the map/address before shooting
-
Use the “minimal” text style option
-

Pro Tips From Real Estate Photographers
The 3-Shot Verification Method
-
Street view with full address visible
-
Front exterior with map overlay
-
Interior key features (kitchen, bath) with date stamp
Lighting Hacks for Interiors
-
Tap to set exposure on the brightest window
-
Use the “night mode” for dimly lit spaces
-
Avoid flash (creates unnatural shadows)
Cloud Backup That Actually Works
-
Set up automatic uploads to:
-
Google Drive (for team sharing)
-
Dropbox (for client delivery)
-
-
Create shared folders by:
-
Property address
-
Month/Year
-
GPS Map Camera vs Competition
| Feature | GPS Map Camera | Alternatives |
|---|---|---|
| Map Quality | Full Google Maps | Basic static maps |
| Customization | Adjustable overlay position | Fixed templates |
| File Management | Automatic sorting | Manual organization |
| Real Estate Use | 9/10 | 6/10 at best |
Where competitors fall short:
-
Most don’t save clean/stamped versions
-
Few offer proper map integration
-
Many lack professional file naming
Conclusion :
Perfect For:
-
Realtors documenting 10+ properties weekly
-
Property managers doing condition reports
-
Appraisers needing verifiable evidence
-
Investors tracking multiple properties
Not Ideal For:
-
iOS users (Android only)
-
Those who only need social media photos
-
Teams requiring instant photo sharing
While not perfect, this remains the most efficient way to:
-
Document property conditions
-
Create legally verifiable photos
-
Maintain organized visual records
FAQ
Where can I download GPS Map Camera safely?
Get the official version on Google Play Store or visit the developer’s site. Avoid third-party APKs to prevent security risks.
How do I geotag property photos properly?
-
Enable high-accuracy GPS in settings
-
Capture an exterior shot first for reference
-
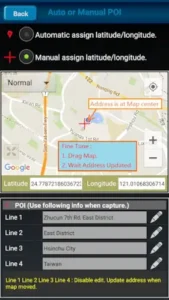
Use manual coordinates for interior shots (drag map pin to adjust)
-
Set file names to include property address
Can I edit location data after taking photos?
Yes – use the manual latitude/longitude adjustment feature. Drag the map pin to refine positions, especially useful for indoor shots where GPS struggles.
Why does the address sometimes show inaccurately?
This happens when:
-
GPS signal is weak (wait for green indicator)
-
You’re in a newly developed area
-
The map hasn’t refreshed (try moving the pin slightly)
